Back in Utah

It’s been a while, but I promise we’ve been eating. It’s a little different now that we’re in rural Utah and the closest grocery store is about an hour away, and even that’s a rural grocery store. Here is one of the first meals we made when we got back and were visiting a friend:

IMG_0086

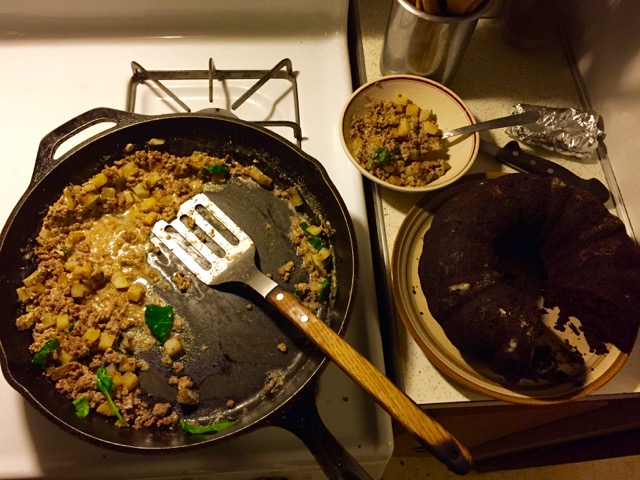
It was a beef and potato green curry, and here’s the recipe:

beef (preferably from a field-butchered bull that broke its leg up on the mountain that you and your friends hiked out with)
potatoes
spinach
Thai green curry paste
a can of coconut milk
fish sauce
coconut oil

  1. Cube the potatoes and heat coconut oil in a large iron pan with the cover on over low heat
  2. Get in a pickup truck with your friend and drive up the ledge to help take the big yurt pieces off of your friend’s yurt from when the wind blew it down this past winter
  3. Drive down, unload the pieces, and add the potatoes
  4. Drive back up and make a second trip for the furniture
  5. Drive back down and stir the potatoes
  6. Unload the furniture
  7. Stir the potatoes again and add the beef
  8. When the beef is brown, add the coconut milk, green curry paste, and fish oil (add more fish oil than you’re comfortable with) – bring it to a boil then lower the heat
  9. When it’s simmered for a bit, add the spinach and cook until the spinach wilts

The result is a really tasty curry. Usually when we make this, we’ll add onions and ginger and any other veggies we have on hand and the result is always good. Oh – and it’s even better with Caitlin’s Mary Orr cake.


Back in Utah

The Three Little Pig (Burgers)

I flew to Seattle for the day for work the other week and one of the things I watched on the flight was a woman making some kind of Korean burger out of minced steak that had been marinated in a ginger-soy concoction. Yum.

One of the first things I did when I got back was to buy some ground pork and try a little variation on it:

soy or tamari sauce
sesame oil
ginger
garlic
scallions
sugar
ground pork
fresh cilantro
buns

  1. Make the marinade by combining the soy sauce, ginger, garlic, scallions, sesame oil, and a little bit of sugar. I’d say I used a few tablespoons of soy, a lot of ginger, a couple of cloves of garlic, a scallion, and just a bit of the sesame oil and sugar.
  2. Mix the meat in with the marinade (I used a pound for three burgers and they were big), make patties, and cook them. When I cook fatty meat on a skillet, I don’t use extra fat. The meat will stick at first, but they are typically ready to flip when the meat chars slightly and releases itself from the pan. Or at least that’s what I like to think.
  3. Let the burgers rest a minute or so – cooling will help them retain their juices – and place them on a toasted bun, topped with some cilantro and hot sauce.

So good! There is a reason a lot of Asian cuisine uses ginger, soy, and garlic, and these were actually reminiscent of the dumplings I grew up loving. We ate the burgers with some kind of green we got at the market that was described as a Japanese spinach, which was also good.

IMG_6337

(The third burger was for my mom, not the baby.)

IMG_6345

The Three Little Pig (Burgers)

Soft scrambled

Have I ever told you about my idea to open a breakfast place in San Francisco that serves Hard Scrambled Eggs and sells Toast for 5¢? No one would ask you what kind of toast you wanted because it would all be on white bread (ok, maybe all sourdough). We would sell Pancakes and French Toast and neither would have any sort of cheese or fruit in them.

All that aside, I do like my eggs softly scrambled, the way Jacques Pepin would make a classic french omelet as opposed to what he calls a country omelet, which is closer to the way most of us grew up with scrambled eggs. The difference is in the size of the curds. You control the size of the curds by how much you agitate it and by controlling the heat. Bigger curds happen with higher heat and less agitation.

There are lots of places to learn how to scramble eggs, from Jacques’ omelet method to Gordon Ramsay’s popular method. The things I’ve taken away from those is to:

  1. Decide what kind of eggs you want beforehand
  2. Use a heavy pan that will hold heat
  3. Use butter, milk, cream, or something similar to get a nice, creamy texture
  4. Use heat and agitation appropriate to what you want

One reason I don’t always make creamy, soft scrambled eggs is because it usually makes the pan comically difficult to clean, but I digress…


If you’re cooking with eggs and have either a baby or a camera in one hand, it’s good to know how to crack them cleanly just using the other. I finally learned this trick when I realized that it’s all about the squeeze. After you crack the shell, squeeze with your thumb and middle finger, then pry the egg apart. The third picture shows how I position my hand to make that happen.

IMG_6187

This time, I added the eggs and butter into a mostly cold pan and started beating immediately. Notice the empty burner to the right. That’s important if you need to take the eggs off the heat for a bit.

I usually cook the eggs with a rubber spatula until I can see the pan while I’m stirring, then I move it off the heat and scramble some more until it cools down, then back on the heat

IMG_6189

(sorry for the blurry picture, I was just moving that fast)

I usually take it off the heat just before it’s done and let the heat from the pan finish it. It takes constant attention, but is delicious, especially with a stiff piece of toast with some butter melted on top.

IMG_6191

Soft scrambled

Fried Rice

I realized recently that this blog is about cooking food with a newborn and I have shown a lot of cooking but no newborn. Most of these meals I’ve made while wearing him in a sling – the Baby K’tan. He’s really small and it’s the only one that keeps him remotely secure. It was important for me to figure out early how to watch him without feeling like I couldn’t do anything else, so he was in it the first day we got home.

Can we talk for a little bit about the name Baby K’tan? I’ve done some searching and can’t find any K’tans for later stages in life. I find that a little annoying.

IMG_6245When I made this meal, though, he was just getting used to
being in his car seat, so I rigged it up with a broom stick so I could rock him with my foot while still attending the stove.

On to the recipe…

My mother is a great cook, which she used to her advantage. When my sister and I were teenagers, we hosted afterparties at our house for proms or school shows. There would be dozens of people and we’d stay up all night. My mom would stay up all night, too, making food for us (and keeping an eye on things) and everyone loved it. One year she must’ve cooked three huge batches of fried rice until three or four in the morning.

We had some ginger rice left over from the fish dish that I figured I’d save for jook or this. Since we still had some jook, I made fried rice.

IMG_6249

I took my inspiration from Gimme Some Oven’s fried rice recipe. I like that she’s been trying to perfect it for so long and that she uses a lot of butter. Here’s my version based on what I had available (and it was delicious):

leftover rice (maybe 2 cups?)
two boneless chicken thighs
carrots
broccoli
frozen peas
scallions
tamari/soy sauce
sesame oil
butter

  1. Scrape (don’t slice) most of the fat off the chicken thighs – hold your knife at a 90° angle to the chicken and scrape away from the meat. Most of the fat will come away, and you want to leave some fat there anyway. Then cut the chicken into bite-sized bits.
    IMG_6248
  2. I like to use the fat, so I rendered it in the pan by adding a little water and cooking it on low heat.
  3. Take the solid fat out, add some butter and brown the chicken on med-high heat.
    IMG_6250
  4. Take the chicken out, add more butter and hard scramble the eggs.
    IMG_6251
  5. Take the eggs out, add more butter and cook the veggies according to how you like them. I started with the broccoli and carrots because they take the longest, then added the whites of the scallion, then the peas. Cook until everything is almost done.
    IMG_6254
  6. Add the rice (cold) and cook it until it’s a little crispy. Things are going to start sticking to the pan at this point.
  7. Add some tamari sauce and use the liquid to scrape some things off the bottom of the pan.
  8. Finally, add the sesame oil, chicken, eggs, and scallion greens. Cook for another minute or so and serve.
    IMG_6257

Like I said, this was delicious and I’m not even sure if the left-overs made it until the next day. I might have eaten them while I was with the baby in the middle of the night.

Some of you might be asking, “Why chicken thighs and not breasts?” It’s because chicken thighs taste like something: chicken. Don’t ever eat chicken breasts; why would you do that to yourself?


Fried Rice

Surprise Omelette

I hadn’t planed on blogging this morning’s meal – it was sort of a throw away last minute breakfast but it was delicious (thanks mostly to Caitlin), so here it is: 

onions
garlic
mushrooms
baby arugula
4 eggs

optionally:
parmesan cheese
red pepper

  1. Sauté the onions and garlic on medium-high heat in an oven-proof pan, then add the mushrooms and cook  on medium-low heat until they are tender, then add the arugula and cook for a bit.
  2. Add beaten eggs, mix it around so things aren’t bunched up too much, then throw the pan under the broiler until it just starts to brown.
  3. Add parmesan cheese, red pepper flakes, salt, and pepper to taste.

We ate ours with bacon (also cooked in the oven) and toast with browned butter. So good.

Surprise Omelette

The last supper (with champagne)

The first time I had miso-glazed cod was actually in London at Nobu many years ago. It’s one of their signature dishes, though I didn’t know that at the time, and it stuck with me.

Protein and omega 3 fatty acids have a lot of benefits for breastfeeding mothers and their babies, including helping with a baby’s brain development and helping with postpartum depression (in the mother). Cod is high in protein and while it doesn’t have as much omega 3 as salmon, it does have some. One of our healthcare providers suggested fish as a good food for breastfeeding, and I’ve been meaning to try to make the miso cod anyway. Plus miso is nice to have on hand for a warm, quick snack.

IMG_6198

There are a lot of recipes online for how to recreate Nobu’s cod. Some relatively complex, calling for sake, mirin, sugar, sesame oil, etc… and others as simple as spreading miso on the fish. We didn’t have any sake, but did have some champagne left over that a friend brought so I decided to use that. Plus it was New Year’s Eve, so appropriate. In retrospect, sugar and a little more liquid would have made the marinade more like a glaze, but it was still really tasty.

The ginger and the scallions were for the rice. I just chopped off about an inch of ginger and put it in with the rice as it cooked, then topped with scallions.

Here’s what I did for the fish:

fillets of cod – enough for two (ask your fishmonger)
champagne, sake, or some kind of white wine
miso paste (I used white)

  1. Put a couple of tablespoons of miso in a bowl, and thin with the wine until it will easily coat the fish.
  2. Put the fish in the bowl, cover it with the marinade, and let it sit in the fridge for at least 30 minutes.
  3. Put a heavy pan or baking dish in the oven on the top rack and turn on the broiler.
  4. When the pan is hot, add the fish (I scraped some of the extra miso off first). Broil each side for 3-4 minutes and serve.

If you’re going to make white rice, you can start it when you put the fish in the fridge. Start brown rice about 30 minutes earlier. While you’re waiting for the fish to marinade, you can cook some kind of green. I boiled broccoli, which was nice because I didn’t have to watch it much.

I foiled the pan because it’s not mine and I didn’t want to “fish it up,” but that’s not necessary. If your fish has the skin on, leave it – it’s great for you. If you time everything carefully, everything will be done with the fish and you can serve it immediately.IMG_6205

And Happy New Year!

The last supper (with champagne)

Caprese and leftovers

Nothing dresses up leftovers like something you’ve prepared fresh (it’s true). Caitlin decided to make a “salad of Capri” to go with last night’s dinner, and it was delicious.

fresh mozzarella
tomatoes
fresh basil
olive oil
salt

Cut up the tomatoes and mozzarella – you’re looking for about a 1:1 ratio. Add basil and salt and mix it up. Top with fresh basil.

IMG_6181

Caitlin also likes to throw some avocado in if we have it, which is great.

What to do with leftovers: Toast some bread with some olive oil on it then top with the Caprese and you have a delicious bruschetta.

An aside on how to keep fresh basil fresh – put the basil stems down in a glass (like a flower arrangement), and then cover the whole thing with a plastic bag.

Caprese and leftovers

1st meal with the bird

We’ve been picking at the quart of chicken meat, but it was time to do something more serious – chicken salad. Chicken salad is easy enough to just buy but it’s also easy to make. I checked the fridge for things that might work well in the salad:

IMG_6152

I found some carrots and an apple. Mostly that’s just for show though, because as with her turkey sandwiches, Caitlin insists on a strict recipe of chicken, mayo, and salt for her chicken salad.

To make it, chop up the chicken then mix it in a bowl with a lot of mayo and a little salt. Then put it on a sandwich and chop that up, too.

A half quart of chicken made a couple of sandwiches with some left over for snacking the next couple of days.

Other stuff you might consider putting in are things to give it some crunch and/or flavor like onions, celery, apples, tortilla chips, raisins, black pepper, tomatoes… look around, you’ll find something.

1st meal with the bird

How to not burn eggs

Fried eggs are easy, but you still might not have time to watch them, so this is how I cook eggs to almost perfect without being there.

  1. Heat up a heavy skillet, cast iron if you have it, until it’s really, really hot.
  2. Add butter and let it brown a little, then crack the eggs in it, cover the pan, turn the heat off, and walk away.

But wait, before you walk away put some bread in the toaster. If you have a toaster oven, spread some butter on it first. By the time the toast is done, the eggs should be perfect. But if you do happen to leave them in a little longer (like I did), the worst they’ll be is overcooked (like mine were), not ruined.

How to not burn eggs